Greetings to all. Wow, it's been quite a while since I've blogged and much has happened since then. I still plan on updating this with some more AppleScript stuff and some other things I've been getting interested in, but I've just been too busy. Stay tuned for more.
The most important news is that I've accepted a position at Google. Pretty exciting for me to be moving from my remote village here in Baltimore to the heart of the Silicon Valley. How this all happened is that I got an email from a Google recruiter through my profile on linkedin.com (I highly recommend this site to everyone), and figured, sure, what the heck, I'll talk to you. After two phone interviews I got a rejection email while I was at WWDC. A week later, I got a call from another recruiter saying that they wanted to bring me in for a live interview. Flew out and had a day of discussion and answering lots of questions and here I sit, offer in hand. I'm going to start there in the end of September. I figure that I've been with my current company for a long long time and it's time for something different. East coast to west coast, Government contractor to commercial search engine giant. Should be fun.
Anyway, it's been a bit of a busy couple of months.
Jul 23, 2007
Jun 6, 2007
Heading to WWDC.
Well, I'm very excited this year to be off to WWDC again. Blogging this year has been a pleasure and I hope that I can meet some of the people that have made this a worthwhile exercise for me.
Thanks,
Paul Franceus
Thanks,
Paul Franceus
Jun 3, 2007
Automator - Cocoa based action with AppleScript integration
I've built a bunch of Automator actions lately. Most of these have been simple AppleScript actions, with a few Shell based actions thrown in. I'll probably talk about some of those in future postings.
Right now I want to talk about one particular action I built that incorporated a combination of AppleScript and Objective-C code. There are a couple of ways to build such a “hybrid” action as Apple's documentation calls it. One way is to use primarily AppleScript, with added Objective-C classes that are called from the AppleScript. The other way is to primarily use Objective-C, with small amounts of AppleScript as necessary.
The reason I went down this road is that I was building a search action for DEVONagent. DEVONagent is a very cool program that allows you to search using multiple search engines, following links along the way, and aggregating the results. It then extracts the common key topics from the web pages it searches and builds clustering diagrams based on the results. Here's an example based on a search for “Apple WWDC”
 DEVONagent showing search results
DEVONagent comes with some useful actions out of the box, but it does not come with an action to initiate a search(!), so I decided to write one. One of the main features of the program is its use of “search sets” and plugins to allow searches to be customized. That search set list can be dynamic - users can develop their own custom search sets for specialized sites or for any reason whatsoever.
Therefore I wanted my UI for my action to reflect the current list of search sets available in the program. So, I needed to be able to query DEVONagent for its list of search sets, and then populate a popup menu in the action's interface with the current list. Then, I wanted the selected search set to be used to perform the search.
To me, querying the list of search sets, and executing the search sound like jobs for AppleScript, and populating a user interface popup menu sounds like a job for Cocoa bindings and Objective-C. I believe that this type of action is possible to write completely in AppleScript, but at this point my Obj-C is much stronger than my Applescript so I decided to call AppleScript from my Cocoa based action.
The first step for me was to take a look at DEVONagent's scripting dictionary to see if it could do what I wanted it to do. The program has a pretty extensive scripting dictionary and I quickly found what I needed using the Script Editor application. Here's the application dictionary showing search sets:
 DEVONagent "application" object dictionary
Executing a search was similarly easy. Here's the search command in the dictionary:

And here's the script to run a search. I chose to search for “Apple WWDC” for which I've already shown the results.

Now, I have to build the action. Starting XCode, I'll choose “Cocoa Automator action” from the project list and call it “Perform Search With Specified Text” The name is long because the project name is what shows up in Automator and it needs to be descriptive. This action is intended to use text fed in as input from the previous action as the search terms and search using whatever search set the user selects.

The project defines a class for the action that is a subclass of AMBundleAction. There is also a nib file, which presents the interface for the action. Let's start with our Objective-C code. The class predefines a method called -(id)runWithInput:(id) fromAction:(AMAction *)anAction error:(NSDictionary **)errorInfo. We've added one getter method to return the list of search sets so we can bind the popup in the GUI to something. Here's the header for the class:
Here's the implementation:
I've created a DevonAgent class to encapsulate all interaction with the application. I suspect that at some time in the future the need to write this class will go away.
-awakeFromBundle is called when this class is loaded, similarly to how -awakeFromNib is called when a class is instantiated out of the nib. This is where we connect to the DevonAgent class. We also set the initial selectedSearchSet parameter so that the user interface will reflect the selection. You call -parametersUpdated to tell the user interface to update its configuration based on the parameters.
When the interface needs the search sets, we go ask for it from the app.
At this point we grab our parameters and get the “selectedSearchSet” parameter. I'll talk about how the parameters get set in a little while. Suffice it to say at this point that there are parameters and that these are set by selecting controls in the GUI and they are populated by Cocoa Bindings in the nib file.
Now, runWithInput:fromAction:error is called when the action is run. We simply grab the currently selected search set out of the parameters for this action and launch the search. We're not returning the results of the search in this action. When DEVONagent runs, we can tell it to run a script when the action finishes (it can take quite a while for these searches to run, depending on the settings) and at that point we'd want to launch the next phase of the workflow.
This part of the action is pretty straighforward. Here's the DevonAgent class interface:
And the implementation:
This method is used to make sure that there is a selected search set when the interface is first populated. This is a good default.
The searchSets method executes the AppleScript code:
This is equivalent to but shorter than:
The result of executing an AppleScript program is an NSEventDescriptor object which contains the results of the script. In this case, it contains the list of names of all the current search sets. Because this will get called as soon as the action is dragged out into the workflow, you shouldn't be surprised to see DEVONagent launch itself at that time. One thing that is important to remember is that the index in a NSAppleEventDescriptor list starts at one, not zero as you might expect.
This method executes the search.
On to the nib. When you open the MainMenu.nib file for your action you will see a view with nothing but a placeholder string. The nib file also contains a controller object called “Parameters.” This controller is used to pass parameters from the interface to the script. In the case of the Cocoa action, the AMBundleAction class has a -parameters method that returns an NSMutableDictionary containing the parameters defined in the nib.

The first thing I'll do here is to build my view. It's pretty simple, a string and an NSPopUpButton.

We will bind the "contentValues" of the NSPopUpButton to the “searchSets” key of the file's owner, which is our action class. This will make sure that the list reflects the search sets in the application. We bind the “selectedValue” to the Parameters object controller selection.selectedSearchSet to make sure that the parameters get the updated value.

That's all that's necessary for the nib file.
There's only two more steps. First, we have to edit the info.plist and infoPlist.strings to define our inputs and outputs and to fill in the description window in Automator. To do that, we will select Project > Edit Active Target “Perform Search with Specified Text” and select the Properties tab. Here are my settings for each of the panes of this dialog box that I modified:


I don't edit the description here in this dialog box since the localized ones in infoPlist.strings seem to override them. Here's what the action looks like in Automator once all the documentation has been filled in.

The last step is testing. One of the great things about developing automator actions is that they are very easy to debug. Whether you are developing in Objective-C or Cocoa, the XCode debugger will launch automator for you, load your action into the program, and then when you run your workflow you can debug the action just like any other program.
Well, that's how I built a Cocoa based Automator action that uses AppleScript to communicate with one specific commercial app. The action uses AppleScript to extract information from a program and to control its operations. Cocoa and Cocoa bindings are used to populate a popup list with dynamic information from the app. I hope that you found this interesting and informative. Until next time, happy coding.
Right now I want to talk about one particular action I built that incorporated a combination of AppleScript and Objective-C code. There are a couple of ways to build such a “hybrid” action as Apple's documentation calls it. One way is to use primarily AppleScript, with added Objective-C classes that are called from the AppleScript. The other way is to primarily use Objective-C, with small amounts of AppleScript as necessary.
The reason I went down this road is that I was building a search action for DEVONagent. DEVONagent is a very cool program that allows you to search using multiple search engines, following links along the way, and aggregating the results. It then extracts the common key topics from the web pages it searches and builds clustering diagrams based on the results. Here's an example based on a search for “Apple WWDC”
 DEVONagent showing search results
Therefore I wanted my UI for my action to reflect the current list of search sets available in the program. So, I needed to be able to query DEVONagent for its list of search sets, and then populate a popup menu in the action's interface with the current list. Then, I wanted the selected search set to be used to perform the search.
To me, querying the list of search sets, and executing the search sound like jobs for AppleScript, and populating a user interface popup menu sounds like a job for Cocoa bindings and Objective-C. I believe that this type of action is possible to write completely in AppleScript, but at this point my Obj-C is much stronger than my Applescript so I decided to call AppleScript from my Cocoa based action.
The first step for me was to take a look at DEVONagent's scripting dictionary to see if it could do what I wanted it to do. The program has a pretty extensive scripting dictionary and I quickly found what I needed using the Script Editor application. Here's the application dictionary showing search sets:
 DEVONagent "application" object dictionary
And here's the small script I wrote to query the app for the list of search sets:
 AppleScript to list search sets
 AppleScript to list search sets
Executing a search was similarly easy. Here's the search command in the dictionary:

And here's the script to run a search. I chose to search for “Apple WWDC” for which I've already shown the results.

Now, I have to build the action. Starting XCode, I'll choose “Cocoa Automator action” from the project list and call it “Perform Search With Specified Text” The name is long because the project name is what shows up in Automator and it needs to be descriptive. This action is intended to use text fed in as input from the previous action as the search terms and search using whatever search set the user selects.

The project defines a class for the action that is a subclass of AMBundleAction. There is also a nib file, which presents the interface for the action. Let's start with our Objective-C code. The class predefines a method called -(id)runWithInput:(id) fromAction:(AMAction *)anAction error:(NSDictionary **)errorInfo. We've added one getter method to return the list of search sets so we can bind the popup in the GUI to something. Here's the header for the class:
#import <Cocoa/Cocoa.h>
#import <Automator/AMBundleAction.h>

@interface Perform_Search_with_Specified_Text : AMBundleAction
{
}
- (NSArray *)searchSets
- (id)runWithInput:(id)input
        fromAction:(AMAction *)anAction
             error:(NSDictionary **)errorInfo;

@end
Here's the implementation:
#import “Perform Search with Specified Text.h“
#import “DevonAgent.h“

@implementation Perform_Search_with_Specified_Text

static DevonAgent *devonAgent = nil;
I've created a DevonAgent class to encapsulate all interaction with the application. I suspect that at some time in the future the need to write this class will go away.
- (void)awakeFromBundle{
    if( devonAgent == nil ){
        devonAgent = [[DevonAgent alloc] init];
    }
    [[self parameters] setValue:[devonAgent defaultSearchSet]
                         forKey:@“selectedSearchSet“];
    [self parametersUpdated];
}
-awakeFromBundle is called when this class is loaded, similarly to how -awakeFromNib is called when a class is instantiated out of the nib. This is where we connect to the DevonAgent class. We also set the initial selectedSearchSet parameter so that the user interface will reflect the selection. You call -parametersUpdated to tell the user interface to update its configuration based on the parameters.
- (NSArray *)searchSets{
    return [devonAgent searchSets];
}
When the interface needs the search sets, we go ask for it from the app.
- (id)runWithInput:(id)input
        fromAction:(AMAction *)anAction
             error:(NSDictionary **)errorInfo
{
    NSString *selectedSearchSet =
  [[self parameters] valueForKey:@“selectedSearchSet“];
At this point we grab our parameters and get the “selectedSearchSet” parameter. I'll talk about how the parameters get set in a little while. Suffice it to say at this point that there are parameters and that these are set by selecting controls in the GUI and they are populated by Cocoa Bindings in the nib file.
    [devonAgent performSearchFor:input
                  usingSearchSet:selectedSearchSet
                           error:errorInfo];
    return input;
}

@end
Now, runWithInput:fromAction:error is called when the action is run. We simply grab the currently selected search set out of the parameters for this action and launch the search. We're not returning the results of the search in this action. When DEVONagent runs, we can tell it to run a script when the action finishes (it can take quite a while for these searches to run, depending on the settings) and at that point we'd want to launch the next phase of the workflow.
This part of the action is pretty straighforward. Here's the DevonAgent class interface:
#import <Cocoa/Cocoa.h>

@interface DevonAgent : NSObject {
}
- (NSString *)defaultSearchSet;
- (NSMutableArray *)searchSets;
- (void)performSearchFor:(NSString *)search
          usingSearchSet:(NSString *)searchSet
                   error:(NSDictionary **)errorInfo;
@end
And the implementation:
@implementation DevonAgent

- (NSString *)defaultSearchSet{
    return @“Internet (Fast Scan)“;
}
This method is used to make sure that there is a selected search set when the interface is first populated. This is a good default.
- (NSMutableArray *)searchSets{
    NSMutableArray *searchSets =
     [[[NSMutableArray alloc] init] autorelease];
    NSString *script =
     @“tell application \“DEVONagent\“ to return search sets“;
    NSAppleScript *getSearchSets =
     [[[NSAppleScript alloc] initWithSource:script]
         autorelease];
    NSDictionary *error;
    NSAppleEventDescriptor *result =
     [getSearchSets executeAndReturnError:&error];
    int i;
    int items = [result numberOfItems];
    //Descriptor list index is one based!
    for( i = 1; i <= items; i++ ){
        NSString *setName =
          [[result descriptorAtIndex:i] stringValue];
        [searchSets addObject:setName];
    }
    return searchSets;
}
The searchSets method executes the AppleScript code:
tell application 'DEVONagent' to return search sets
This is equivalent to but shorter than:
tell application 'DEVONagent'
 return search sets
end tell
The result of executing an AppleScript program is an NSEventDescriptor object which contains the results of the script. In this case, it contains the list of names of all the current search sets. Because this will get called as soon as the action is dragged out into the workflow, you shouldn't be surprised to see DEVONagent launch itself at that time. One thing that is important to remember is that the index in a NSAppleEventDescriptor list starts at one, not zero as you might expect.
- (void)performSearchFor:(NSString *)search
          usingSearchSet:(NSString *)searchSet
                   error:(NSDictionary **)errorInfo{
    NSString *script;
    NSString *searchTemplate =
     @“tell application \“DEVONagent\“ to search \“%@\“\
       using set \“%@\““;
    script = [NSString stringWithFormat:searchTemplate,
              search, searchSet];
    NSAppleScript *as =
      [[NSAppleScript alloc] initWithSource:script];
    [as executeAndReturnError:errorInfo];
    [as release];
}

@end
This method executes the search.
On to the nib. When you open the MainMenu.nib file for your action you will see a view with nothing but a placeholder string. The nib file also contains a controller object called “Parameters.” This controller is used to pass parameters from the interface to the script. In the case of the Cocoa action, the AMBundleAction class has a -parameters method that returns an NSMutableDictionary containing the parameters defined in the nib.

The first thing I'll do here is to build my view. It's pretty simple, a string and an NSPopUpButton.

We will bind the "contentValues" of the NSPopUpButton to the “searchSets” key of the file's owner, which is our action class. This will make sure that the list reflects the search sets in the application. We bind the “selectedValue” to the Parameters object controller selection.selectedSearchSet to make sure that the parameters get the updated value.

That's all that's necessary for the nib file.
There's only two more steps. First, we have to edit the info.plist and infoPlist.strings to define our inputs and outputs and to fill in the description window in Automator. To do that, we will select Project > Edit Active Target “Perform Search with Specified Text” and select the Properties tab. Here are my settings for each of the panes of this dialog box that I modified:


The last step is testing. One of the great things about developing automator actions is that they are very easy to debug. Whether you are developing in Objective-C or Cocoa, the XCode debugger will launch automator for you, load your action into the program, and then when you run your workflow you can debug the action just like any other program.
Well, that's how I built a Cocoa based Automator action that uses AppleScript to communicate with one specific commercial app. The action uses AppleScript to extract information from a program and to control its operations. Cocoa and Cocoa bindings are used to populate a popup list with dynamic information from the app. I hope that you found this interesting and informative. Until next time, happy coding.
May 17, 2007
Heading down the road with Automator and AppleScript
Lately, I've been working with a large customer to prototype the use of Macs to see if they are a viable alternative to the Windows based platform that they have standardized on in the past. You and I know this to be the case, but they need some convincing. One of the most compelling things for the users at this customer appears to be the use of Automator to automate their individual workflows.
First of all, the users I am dealing with are not programmers, but somehow when they see Automator they immediately get how it could help them get their jobs done. The problem I've had is that a lot of what these folks do involves querying multiple web sites and passing data from the results of one query to the next.
Certainly, any specific workflow could be implemented in code by a developer, but what I really want to do is to figure out a way to provide them with the tools they need to be able to build their own custom workflows.
So, this has gotten me to finally get off my tail and learn AppleScript and Automator. As a developer, it seemed to me that Automator was nothing more than a flashy toy that would be difficult to get any real work done. But perhaps the truth was that I, with years of C, C++, Java, JavaScript, Objective-C, Perl and Python and my programmer's brain, am not the real target audience for this tool. And AppleScript has always seemed to be a very weird language with strange syntax and poor documentation. Heck some of the best programmers I know have stayed away.
Well, necessity is a good teacher, and so lately I have been developing a lot of Automator actions to fill in the gaps I've seen in the built-in actions and third party additions. I've also become interested in how I can use GUI scripting to enable users to more easily help themselves.
Over the next several posts, I'll share some of my actions, talk about finally getting my head around AppleScript, and head down the GUI scripting road. Perhaps some of you will share some of your own experiences too. It would be great to hear from you.
Here are some good links I've found regarding Automator and AppleScript:
Automator:
http://developer.apple.com/macosx/automator.html
http://automator.us
http://automatorworld.com
http://automatoractions.com
AppleScript:
http://applescriptsourcebook.com/
http://developer.apple.com/applescript/
http://macscripter.net/
AppleScript: The Definitive Guide, 2nd Edition
May 12, 2007
Bicycle commuting around Baltimore
I'm a pretty avid cyclist, and I enjoy commuting to work on my bike. For the past couple of years, I’ve been attempting to compile a list of routes that I use to get around the Baltimore area on my bike. I’d rather avoid driving my bike somewhere to ride, so I’m always looking for ways to jump on my bike at my back door. It’s a little more difficult to find good routes for a city dweller like myself, so I'll be posting them here from time to time in case anyone is interested.

The first 18 miles of this route represent my standard commuting route for the past couple of years. It starts out on the Gwynns Falls Trail, heads out Frederick Rd towards Catonsville, Once through Catonsville, I head south on Hilltop Rd, across the Patapsco river and up Ilchester Rd towards Columbia. The big challenge of this ride comes around mile 11. Heading out, you have to climb an 18 percent grade up the first part of Ilchester. The way home has a similar climb up Hilltop. A more scenic and easier climb up Bonnie Branch Rd. is also an alternative. Normally I’ll ride home the same way, but on weekends I often take the loop route home. The only major difficulty is dealing with the I 95 interchange off of 175, which is much lighter in traffic on the weekend. Mileage to work is about 18, total milage is around 41.
The first 18 miles of this route represent my standard commuting route for the past couple of years. It starts out on the Gwynns Falls Trail, heads out Frederick Rd towards Catonsville, Once through Catonsville, I head south on Hilltop Rd, across the Patapsco river and up Ilchester Rd towards Columbia. The big challenge of this ride comes around mile 11. Heading out, you have to climb an 18 percent grade up the first part of Ilchester. The way home has a similar climb up Hilltop. A more scenic and easier climb up Bonnie Branch Rd. is also an alternative. Normally I’ll ride home the same way, but on weekends I often take the loop route home. The only major difficulty is dealing with the I 95 interchange off of 175, which is much lighter in traffic on the weekend. Mileage to work is about 18, total milage is around 41.
Apr 29, 2007
Cocoa Application with custom Core Image filter 6: Embedding a Quartz Composer composition directly in an app.
In the last episode, we built a Cocoa application to filter an image using Convolution. This application followed a more traditional path to developing a Cocoa application. We took an image from our view, handed it to the model to be processed and sent it back to the view for display. With the advent of Quartz Composer, this application can be implemented in an entirely different way that opens up all kinds of interesting possibilities for interactive graphics applications. I'm sure all of you have seen that Quartz Compositions can respond to external inputs. Quartz Composer can take input from keyboard and mouse, spotlight image searches, folders of images, and even RSS feeds. Apple's RSS screensaver is a prime example of a Quartz Composition that uses RSS input.
An other way of feeding input and getting output from a composition is by publishing input and output parameters from your compositions. In the most simple sense, these will allow Quartz Composer itself to present a simple UI to allow you to interact with your composition. For example, in my test.qtz composition, I publish the inputImage and all the coefficients so that QC can provide a simple user interface.
More interesting than this, however, is the use of a composition embedded within a QCView and accessing its parameters using Cocoa bindings technology and the QCPatchController. I've provided a link to this project so you can see how I did it: Convolver.zip
The first thing you need to do to use these in your projects is to add the Quartz Composer palette to Interface Builder. To do this:
Open Interface Builder Preferences:
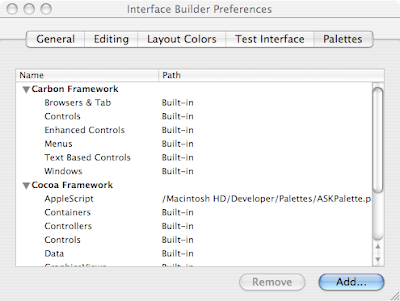 IB preferences showing palettes tab
Click the Add... button:
 selecting the QuartzComposer palette
You will get this new palette in Interface Builder.
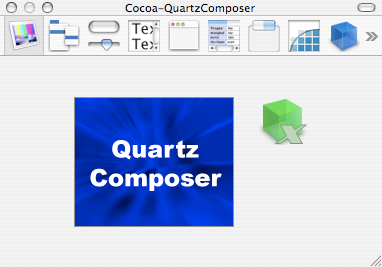 the Quartz Composer palette
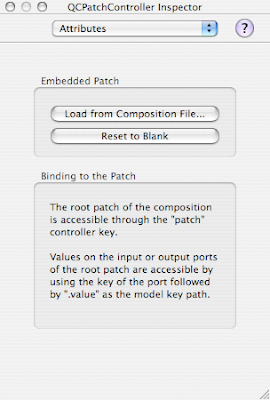
Next, we need to copy the test.qtz composition into the bundle for our application. It doesn't really matter where you put it. For our purposes, we just need to make sure that it is packaged with the app when it ships. After that we need to open the composition and make sure that we publish all the inputs that we care about so that the QCPatchController can access them. In order to do this, you have to right-click on whatever patches in you composition have external inputs or outputs and check off each one you wish to publish. As far as I've been able to tell, there are no shortcuts to this, you have to select each one individually.
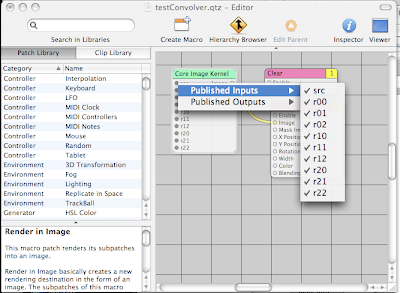 Publishing inputs from the compostion
Whatever you name the inputs or outputs at this point is the key that will be used to access that parameter later.
Now that we have a properly set up composition, we have to modify the original project to use the QCView and QCPatchController instead of old-school target/action. First thing to do is to replace the outputImage NSImageView on the right of the main window of the app with a QCView. Then, drag a QCPatchController into the nib file. I set the erase color of the QCView to transparent to avoid the large black square on the right side of the application when it starts.
Next., we'll go ahead and set up the bindings for the project. The QCView's patch binding is bound to the patch key on the QCPatchController.
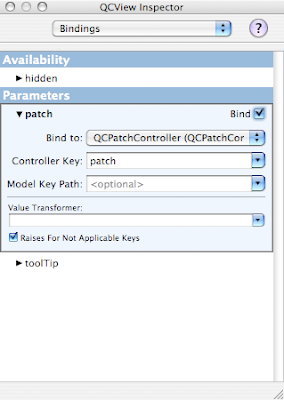
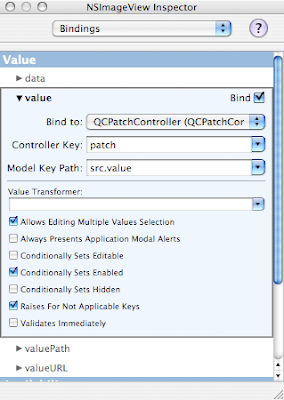
We set the value binding of the NSImageView to the patch of the QCPatchController with the src.value key path.
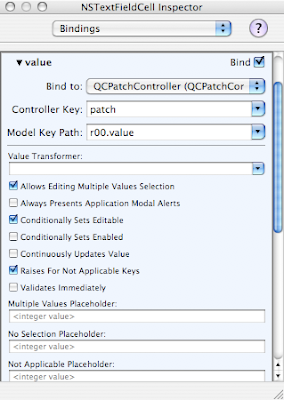
Finally, each cell of the NSMatrix gets bound to the correct value in the composition:
The final piece of this setup is to load the composition into the QCPatchController
Now, you can actually test the working application from within IB. If you choose File->Test Interface and drop an image on the left image view you will see the convolved output image displayed on the right. Of course, this is exploring the barest minimum of the possibly utility of Quartz Compositions and QCView.
This has greatly reduced the amount of Objective-C code we need to write to build this application. The entire Convolver class that converted the image to a CIImage, called the filter and reconverted the result back into an NSImage is not needed any more. I still want to be able to select File->Open... to drop down a sheet and open the image, so that's really the only thing I need the ConvolutionController to do at this point. There turns out to be one small catch that I'll point out when I get to it.
Here's the new header for the ConvolverController class:
This is the source code for the class:
This is normal sheet handling code, just like in the previous project, but a little simpler. The catch comes in when I have to call [resultImage setValue: image forInputKey: @“src“] even though you might think that the bindings for NSImageView should automatically be updated, they are not. Apparently it's an already filed bug and this one line of code provides a simple workaround.
So, that ends the journey of building a Cocoa app with a custom Core Image filter. Hope it was useful to you. This was a very simple example, there's so much more that can be done with these amazing technologies. Until next time, happy coding!
An other way of feeding input and getting output from a composition is by publishing input and output parameters from your compositions. In the most simple sense, these will allow Quartz Composer itself to present a simple UI to allow you to interact with your composition. For example, in my test.qtz composition, I publish the inputImage and all the coefficients so that QC can provide a simple user interface.
More interesting than this, however, is the use of a composition embedded within a QCView and accessing its parameters using Cocoa bindings technology and the QCPatchController. I've provided a link to this project so you can see how I did it: Convolver.zip
The first thing you need to do to use these in your projects is to add the Quartz Composer palette to Interface Builder. To do this:
Open Interface Builder Preferences:
 IB preferences showing palettes tab
Click the Add... button:
 selecting the QuartzComposer palette
You will get this new palette in Interface Builder.
 the Quartz Composer palette
Next, we need to copy the test.qtz composition into the bundle for our application. It doesn't really matter where you put it. For our purposes, we just need to make sure that it is packaged with the app when it ships. After that we need to open the composition and make sure that we publish all the inputs that we care about so that the QCPatchController can access them. In order to do this, you have to right-click on whatever patches in you composition have external inputs or outputs and check off each one you wish to publish. As far as I've been able to tell, there are no shortcuts to this, you have to select each one individually.
 Publishing inputs from the compostion
Whatever you name the inputs or outputs at this point is the key that will be used to access that parameter later.
Now that we have a properly set up composition, we have to modify the original project to use the QCView and QCPatchController instead of old-school target/action. First thing to do is to replace the outputImage NSImageView on the right of the main window of the app with a QCView. Then, drag a QCPatchController into the nib file. I set the erase color of the QCView to transparent to avoid the large black square on the right side of the application when it starts.
Next., we'll go ahead and set up the bindings for the project. The QCView's patch binding is bound to the patch key on the QCPatchController.

We set the value binding of the NSImageView to the patch of the QCPatchController with the src.value key path.

Finally, each cell of the NSMatrix gets bound to the correct value in the composition:

The final piece of this setup is to load the composition into the QCPatchController

Now, you can actually test the working application from within IB. If you choose File->Test Interface and drop an image on the left image view you will see the convolved output image displayed on the right. Of course, this is exploring the barest minimum of the possibly utility of Quartz Compositions and QCView.
This has greatly reduced the amount of Objective-C code we need to write to build this application. The entire Convolver class that converted the image to a CIImage, called the filter and reconverted the result back into an NSImage is not needed any more. I still want to be able to select File->Open... to drop down a sheet and open the image, so that's really the only thing I need the ConvolutionController to do at this point. There turns out to be one small catch that I'll point out when I get to it.
Here's the new header for the ConvolverController class:
Some of you may look at this and wonder why I need a pointer to the resultImage any more since the bindings should take care of it. That's where the catch comes in, as you'll see below.
/* ConvolverController */

#import <Cocoa/Cocoa.h>
#import <QuartzComposer/QuartzComposer.h>
#import <QuartzCore/QuartzCore.h>/span>


@interface ConvolverController : NSObject
{
    IBOutlet QCView *resultImage;
    IBOutlet NSImageView *sourceImage;
    IBOutlet NSWindow *window;
}
- (IBAction)openImage:(id)sender;
@end
This is the source code for the class:
#import “ConvolverController.h“


@implementation ConvolverController

- (IBAction)openImage:(id)sender
{
    NSOpenPanel *panel = [NSOpenPanel openPanel];
    [panel beginSheetForDirectory: nil
                             file:nil
                            types:
               [NSImage imageFileTypes]
                   modalForWindow: window
                    modalDelegate:self
                   didEndSelector:
  @selector(openPanelDidEnd:returnCode:contextInfo:)
                      contextInfo:nil];
}

- (void)openPanelDidEnd:(NSOpenPanel *)panel
           returnCode:(int)returnCode
          contextInfo:(void  *)contextInfo{
    NSArray *files = [panel filenames];
    NSString *filename = [files objectAtIndex:0];
    NSImage *image = [[[NSImage alloc]
    initByReferencingFile:filename]
       autorelease];
    [sourceImage setImage: image];
    [resultImage setValue: image forInputKey: @“src“];
}
@end
This is normal sheet handling code, just like in the previous project, but a little simpler. The catch comes in when I have to call [resultImage setValue: image forInputKey: @“src“] even though you might think that the bindings for NSImageView should automatically be updated, they are not. Apparently it's an already filed bug and this one line of code provides a simple workaround.
So, that ends the journey of building a Cocoa app with a custom Core Image filter. Hope it was useful to you. This was a very simple example, there's so much more that can be done with these amazing technologies. Until next time, happy coding!
Apr 10, 2007
Cocoa application with custom Core Image filter 5: calling the filter from a Cocoa app.
Last time in the village we packaged our convolution filter as an image unit. Since the filter was executable, we had to develop an Objective-C class that inherited from CIFilter and implemented a few methods. This time we will see how we can call our image unit from a Cocoa application. This technique will generalize to any other Image Unit in the system, built in or otherwise.
For the purposes of testing, I've created a simple Cocoa application called Convolver. As you can see, Convolver has one main window with two NSImageViews and a separate pallette with a 3x3 NSMatrix of coefficients. Dropping an image on the left view causes the right view to update with a processed version of the left image. Changing the coefficients immediately causes the filter to run and change the rightmost image.
 The structure of this application is pretty simple. There is an application controller called ConvolverController and a very simple model (Convolver) which only takes an unprocessed NSImage with an array of coeficients and returns a processed one. Taking a look at the nib file there are the user interface objects, the controller and the model all instantiated in the nib.
 The inspector for the ConvolverController object shows the outlets for the controller.
 The sourceImage, convolutionMatrix and the File->Open menu all have their targets set to the convolve: method of the controller, so that opening an image or changing the coefficients of the matrix will cause the image to be processed again.
The Convolution controller class is very simple. Here's the interface for that class
and here's the implementation:
The implementation of the Convolver class and the processImage:withCoefficients: method are the most important part of this exercise. Here's the header:
/* Convolver */
and here's the implementation:
The only other method in this class is processImage:withCoefficients and I'll break it down for you a step at a time.
The first thing we need to do is to get a Core Image graphics context which we get from our current graphics context.
Now, since we are using an NSImageView we need to convert the NSImage within into a CIImage. The way I am doing this is by using the initWithFocusedViewRect: method to get a bitmap representation of the NSImage and then using that bitmap to initialize a CIImage object with that bitmap. Personally I'm not sure why there are multiple image types in Cocoa (I'm sure someone at Apple would have the reason) but it's just something we have to deal with.
The next step is to set the parameters for the filter. We first call setDefaults to get the parameters in a known good state in case we don't want to set all of them. Core Image uses Key-Value coding to set all its parameters. Apple uses this technology so often, and it has turned out to be so useful for all kinds of applications that I don't know what we did before it. One minor annoyance is that we have to make NSNumber objects for each of the float parameters since Cocoa doesn't have any sort of automatic coercion like there is in Java 1.5.
Finally, we get the value for the “outputImage” key which calls the outputImage method in the filter class and actually produce the result.
Now we have to convert back to a NSImage. Unfortunately from what I can tell, there's no way to just get a bitmap representation out of a CIImage object. If anyone knows of a better way to do this, please leave a comment! So, we draw the CIImage into our NSImage object and return it.
That's the end of this tale. There is another angle on this same problem, however. Instead of converting images and calling filters, we can embed the Quartz Composer composition we developed as a test directly into our application by using a QCView and controlling our composition using the QCPatchController. Next time we'll reimplement this app using those techniques.
For the purposes of testing, I've created a simple Cocoa application called Convolver. As you can see, Convolver has one main window with two NSImageViews and a separate pallette with a 3x3 NSMatrix of coefficients. Dropping an image on the left view causes the right view to update with a processed version of the left image. Changing the coefficients immediately causes the filter to run and change the rightmost image.
 The structure of this application is pretty simple. There is an application controller called ConvolverController and a very simple model (Convolver) which only takes an unprocessed NSImage with an array of coeficients and returns a processed one. Taking a look at the nib file there are the user interface objects, the controller and the model all instantiated in the nib.
 The inspector for the ConvolverController object shows the outlets for the controller.
 The sourceImage, convolutionMatrix and the File->Open menu all have their targets set to the convolve: method of the controller, so that opening an image or changing the coefficients of the matrix will cause the image to be processed again.
The Convolution controller class is very simple. Here's the interface for that class
/* ConvolverController */

#import <Cocoa/Cocoa.h>
#import “Convolver.h“

@interface ConvolverController : NSObject
{
    IBOutlet NSMatrix *convolutionMatrix;
    IBOutlet Convolver *convolver;
    IBOutlet NSImageView *resultImage;
    IBOutlet NSImageView *sourceImage;
    IBOutlet NSWindow *window;
}
- (IBAction)convolve:(id)sender;
- (IBAction)openImage:(id)sender;
@end
and here's the implementation:
The convolve: method is called whenever the source image or coefficient matrix is changed. Notice that I pass the matrix cells unaltered to the model. At first I thought I would pull the information out of these cells and pass an array of NSNumber, but then I decided that I would just make sure that the model would take the floatValue: of whatever input it got to make sure I got the correct input type. Without strong typing, it seemed that I would have to do this in the model anyway, so I just do it there. The openImage: method opens a sheet to allow the user to select an image, and the openPanelDidEnd:returnCode:contextInfo: method sets the image file to the source image and calls convolve:
#import “ConvolverController.h“

@implementation ConvolverController

- (IBAction)convolve:(id)sender
{
    NSImage *source = [sourceImage image];
    NSImage *dest = [convolver processImage: source
        withCoefficients: [convolutionMatrix cells]];
    [resultImage setImage: dest];
}

- (IBAction)openImage:(id)sender
{
    NSOpenPanel *panel = [NSOpenPanel openPanel];
    [panel beginSheetForDirectory: nil
                             file:nil
                            types: [NSImage imageFileTypes]
                   modalForWindow: window
                    modalDelegate:self
                   didEndSelector:
@selector(openPanelDidEnd:returnCode:contextInfo:)
                      contextInfo:nil];
}

- (void)openPanelDidEnd:(NSOpenPanel *)panel
   returnCode:(int)returnCode
  contextInfo:(void  *)contextInfo{
    NSArray *files = [panel filenames];
    NSString *filename = [files objectAtIndex:0];
    NSImage *image =
[[[NSImage alloc]
initByReferencingFile:filename] autorelease];
    [sourceImage setImage: image];
    [self convolve: self];
}
@end
The implementation of the Convolver class and the processImage:withCoefficients: method are the most important part of this exercise. Here's the header:
/* Convolver */
#import <Cocoa/Cocoa.h>
#import <QuartzCore/QuartzCore.h>

@interface Convolver : NSObject
{
    CIFilter *convolution;
    NSDictionary *filterAttributes;
    CIContext *context;
}
-(NSImage *)processImage:(NSImage *)image
withCoefficients:(NSArray *)coefficients;
@end
and here's the implementation:
The init method loads all the Core Image plugins in the system, and gets the Convolution3x3 filter from the system. We are not going to use the attributes but you can access them and use them if you wish by using the attributes message on the filter you load.
#import “Convolver.h“
@implementation Convolver

-(id)init
{
    if( self = [super init] ){
        [CIPlugIn loadAllPlugIns];
        convolution = [CIFilter filterWithName:
                     @“Convolution3by3“];
        [convolution retain];
        filterAttributes = [[convolution attributes]
                         retain];
    }
    return self;
}
The only other method in this class is processImage:withCoefficients and I'll break it down for you a step at a time.
-(NSImage*)processImage:(NSImage*)image
  withCoefficients:(NSArray*)coefficients
{
    if( context == nil ){
        context = [CIContext contextWithCGContext:
            [[NSGraphicsContext currentContext]
           graphicsPort] options:nil];
        [context retain];
    }
The first thing we need to do is to get a Core Image graphics context which we get from our current graphics context.
Now, since we are using an NSImageView we need to convert the NSImage within into a CIImage. The way I am doing this is by using the initWithFocusedViewRect: method to get a bitmap representation of the NSImage and then using that bitmap to initialize a CIImage object with that bitmap. Personally I'm not sure why there are multiple image types in Cocoa (I'm sure someone at Apple would have the reason) but it's just something we have to deal with.
    NSSize size = [image size];
    [image lockFocus];

    NSRect imageRect =
  NSMakeRect(0, 0, size.width, size.height);

    NSBitmapImageRep* rep = [[NSBitmapImageRep alloc]
  initWithFocusedViewRect:imageRect];
    [rep autorelease];
    CIImage *bitmap = [[CIImage alloc]
                     initWithBitmapImageRep: rep];
    [bitmap autorelease];
    [image unlockFocus];
The next step is to set the parameters for the filter. We first call setDefaults to get the parameters in a known good state in case we don't want to set all of them. Core Image uses Key-Value coding to set all its parameters. Apple uses this technology so often, and it has turned out to be so useful for all kinds of applications that I don't know what we did before it. One minor annoyance is that we have to make NSNumber objects for each of the float parameters since Cocoa doesn't have any sort of automatic coercion like there is in Java 1.5.
    [convolution setDefaults];
    [convolution setValue:bitmap
                forKey:@“inputImage“];

    NSArray *keys = [NSArray arrayWithObjects:
   @“r00“, @“r01“, @“r02“,
   @“r10“, @“r11“, @“r12“,
   @“r20“, @“r21“, @“r22“, nil];

    NSEnumerator *en = [keys objectEnumerator];
    int i = 0;
    NSString *key;
    while( key = [en nextObject] ){
        NSNumber *param =
     [NSNumber numberWithFloat:
        [[coefficients objectAtIndex:i++] floatValue]];
        NSLog(@“key %@ index %d value %@“, key, i-1, param);
        [convolution setValue: param forKey: key];
    }
Finally, we get the value for the “outputImage” key which calls the outputImage method in the filter class and actually produce the result.
    CIImage *result =
   [convolution valueForKey:@“outputImage“];
Now we have to convert back to a NSImage. Unfortunately from what I can tell, there's no way to just get a bitmap representation out of a CIImage object. If anyone knows of a better way to do this, please leave a comment! So, we draw the CIImage into our NSImage object and return it.
    NSImage *outputImage =
    [[[NSImage alloc] init] autorelease];
    [outputImage setSize: size];

    [outputImage lockFocus];
    [result drawInRect: imageRect
              fromRect: imageRect
             operation: NSCompositeSourceOver
              fraction:1.0];
    [outputImage unlockFocus];

    return outputImage;
}
@end
That's the end of this tale. There is another angle on this same problem, however. Instead of converting images and calling filters, we can embed the Quartz Composer composition we developed as a test directly into our application by using a QCView and controlling our composition using the QCPatchController. Next time we'll reimplement this app using those techniques.
Mar 29, 2007
Cocoa Application with custom Core Image filter 4: packaging the filter as an Image Unit
Greetings to all from my remote village. This month is turning out to be incredibly busy, so I'm glad to finally be posting this entry. Last time in the village, we introduced QuartzComposer to test the convolution filter. Now, it's time to package it into an Image Unit. In Core Image, an Image Unit is a way to provide an image processing function as a plug in so that any application in the system that uses Core Image can find and use its function.
Xcode provides an easy way to get started by providing a project template for an “Image Unit Plug in for Objective-C” under “StandardApplePlugins” in the XCode project window.
 When this project is created, it already contains some stub Objective-C code, which we will never touch, An example kernel which will be deleted, and some .plist and .strings files for localization. There are two types of filters, executable and non-executable filters. Non-executable filters run entirely on the GPU and therefore there is no need for any objective-C code in the filter. A nonexecutable filter is determined if all “sample” calls in the filter are of the form color = sample(someSrc, samplerCoord(someSrc)); Since the sample instructions in our filter are of the form: sample(src, (samplerCoord(src) + loc)) which does not match the nonexecutable form, we have an executable filter.
For an executable filter, only the version number, filter class and filter name are read from the Description.plist file. The other parameters need to be defined in an Objective-C subclass of CIFilter. Here's the interface to that class:
So, we declare our input parameters and override 4 methods: init, inputKeys, customAttributes, and outputImage. The names inputImage and outputImage are defined by convention and are used with key-value coding to call your filter. Also, filter processing is done in the outputImage method so that the filter is processed lazily - results are only generated as requested. Here's the implementation of init:
The init method loads the cikernel code out of the bundle and loads it into the static convolutionKernel variable. It is possible to define multiple kernels in a single cikernel file if you wanted to, but I would probably keep them separate in most cases.
The inputKeys method simply returns an array of parameters for the filter:
By far the longest method of the Image Unit is the customAttributes method where we return a NSDictionary containing a separate NSDictionary for each of the filter parameters. Here's what it looks like:
This repeats for all 9 parameters, the only one that is different is r11, which is the center parameter. The value of this parameter defaults to 1, so that by default the filter returns its input unaltered.
As you can see, the attributes of the filter include minimum and maximum slider values in case you wanted to build a dynamic user interface for the filter. These constants are all defined in CIFilter.h.
The final method is the outputImage method. It is very simple:
All we do here is get a sampler for the input image and call apply: with the kernel and all the parameters. This call returns our resulting image.
Once you've compiled this filter you can make it available to the system by placing it in the /Library/Graphics/Image Units folder, or for just your user in ~/Library/Graphics/Image Units. Next time we will see how we call this image unit from a Cocoa program.
Xcode provides an easy way to get started by providing a project template for an “Image Unit Plug in for Objective-C” under “StandardApplePlugins” in the XCode project window.
 When this project is created, it already contains some stub Objective-C code, which we will never touch, An example kernel which will be deleted, and some .plist and .strings files for localization. There are two types of filters, executable and non-executable filters. Non-executable filters run entirely on the GPU and therefore there is no need for any objective-C code in the filter. A nonexecutable filter is determined if all “sample” calls in the filter are of the form color = sample(someSrc, samplerCoord(someSrc)); Since the sample instructions in our filter are of the form: sample(src, (samplerCoord(src) + loc)) which does not match the nonexecutable form, we have an executable filter.
For an executable filter, only the version number, filter class and filter name are read from the Description.plist file. The other parameters need to be defined in an Objective-C subclass of CIFilter. Here's the interface to that class:
#import <QuartzCore/QuartzCore.h>
#import <Cocoa/Cocoa.h>
@interface Convolution3by3: CIFilter
{
  CIImage *inputImage;
  NSNumber *r00;
  NSNumber *r01;
  NSNumber *r02;
  NSNumber *r10;
  NSNumber *r11;
  NSNumber *r12;
  NSNumber *r20;
  NSNumber *r21;
  NSNumber *r22;
}
- (NSArray *)inputKeys;
- (NSDictionary *)customAttributes;
- (CIImage *)outputImage;
@end
So, we declare our input parameters and override 4 methods: init, inputKeys, customAttributes, and outputImage. The names inputImage and outputImage are defined by convention and are used with key-value coding to call your filter. Also, filter processing is done in the outputImage method so that the filter is processed lazily - results are only generated as requested. Here's the implementation of init:
#import “Convolution3by3.h“
@implementation Convolution3by3

static CIKernel *convolutionKernel = nil;

- (id)init
{
  if(convolutionKernel == nil){
    NSBundle *bundle =
     [NSBundle bundleForClass:[self class]];

    NSString *code = [NSString stringWithContentsOfFile:
      [bundle pathForResource:@“Convolution3by3“
                       ofType:@“cikernel“]];

    NSArray *kernels = [CIKernel kernelsWithString:code];

    convolutionKernel = [[kernels objectAtIndex:0] retain];
  }
  return [super init];
}
The init method loads the cikernel code out of the bundle and loads it into the static convolutionKernel variable. It is possible to define multiple kernels in a single cikernel file if you wanted to, but I would probably keep them separate in most cases.
The inputKeys method simply returns an array of parameters for the filter:
-(NSArray *)inputKeys
{
  return [NSArray arrayWithObjects:@“inputImage“,
            @“r00“, @“r01“, @“r02“,
            @“r10“, @“r11“, @“r12“,
            @“r20“, @“r21“, @“r22“, nil];
}
By far the longest method of the Image Unit is the customAttributes method where we return a NSDictionary containing a separate NSDictionary for each of the filter parameters. Here's what it looks like:
- (NSDictionary *)customAttributes
{
      NSNumber *minValue = [NSNumber numberWithFloat:-10.0];
      NSNumber *maxValue = [NSNumber numberWithFloat:10.0];
      NSNumber *zero = [NSNumber numberWithFloat:0.0];
      NSNumber *one = [NSNumber numberWithFloat:1.0];

      return [NSDictionary dictionaryWithObjectsAndKeys:
            [NSDictionary dictionaryWithObjectsAndKeys:
                @“NSNumber“, kCIAttributeClass,
                kCIAttributeTypeScalar,  kCIAttributeType,
                minValue, kCIAttributeSliderMin,
                maxValue, kCIAttributeSliderMax,
                zero, kCIAttributeDefault, nil],
             @“r00“,
             ...
This repeats for all 9 parameters, the only one that is different is r11, which is the center parameter. The value of this parameter defaults to 1, so that by default the filter returns its input unaltered.
             ...
             [NSDictionary dictionaryWithObjectsAndKeys:
                @“NSNumber“, kCIAttributeClass,
                kCIAttributeTypeScalar,  kCIAttributeType,
                minValue, kCIAttributeSliderMin,
                maxValue, kCIAttributeSliderMax,
                zero, kCIAttributeDefault, nil],
             @“r22“, nil];
}
As you can see, the attributes of the filter include minimum and maximum slider values in case you wanted to build a dynamic user interface for the filter. These constants are all defined in CIFilter.h.
The final method is the outputImage method. It is very simple:
- (CIImage *)outputImage
{
  CISampler *src=[CISampler samplerWithImage:inputImage];
     return [self apply: convolutionKernel, src,
   r00, r01, r02,
   r10, r11, r12,
   r20, r21, r22, nil];
}
All we do here is get a sampler for the input image and call apply: with the kernel and all the parameters. This call returns our resulting image.
Once you've compiled this filter you can make it available to the system by placing it in the /Library/Graphics/Image Units folder, or for just your user in ~/Library/Graphics/Image Units. Next time we will see how we call this image unit from a Cocoa program.
Mar 18, 2007
All the Cocoa programming that could be crammed into 5 days
I just spent the last week attending the Cocoa bootcamp from Big Nerd Ranch. I have one thing I'd like to clear up before I get started. The hat is just a prop. That's right, when you go to WWDC and you see Aaron Hillegass walking around with his big texas style cowboy hat, he's doing it for marketing purposes. I guess it works, because when I decided to get some Cocoa training, I remembered Aaron and the hat walking around the Moscone center and on the back of his book: Cocoa(R) Programming for Mac(R) OS X (2nd Edition)
Now, I'm not normally a fan of technical training. Give me a book and a web browser and a project and I'm good. Of course this leads to interesting situations like the time I reverse engineered the Windows virtual to physical address mapping structures while not knowing how to refresh an explorer window (It's F5, right?).
I've been poking around in Cocoa for a while now, and though I feel like I made some decent progress, I'm really interested in this technology and wanted to get a comprehensive overview of it from an expert. Sometimes you just want to do things “right.” I figured that in 5 days I'd get a quick but comprehensive overview of most of the technologies in Cocoa from a well known expert in the technology.
The course did not disappoint. We dove right in to code, with Aaron leading us through an example application immediately, before even lecturing. All the lectures were relatively short, and most of the time in the class was spent actually coding. We mostly followed along with the exercises in the book, but we were encouraged to explore and change things as we progressed. In four and one half days we covered nearly the entire book, as well as several additional chapters that were part of the course materials.
In the evenings, most people chose to come back to the classroom and either continue to work on the exercises or to work on a personal project. Aaron typically stayed around until about 10PM answering questions and being generally helpful.
The people who took the class came from all over the country and the UK and had varied backgrounds and skill levels, but overall, they were extremely competent and interesting folk. It was enjoyable to meet each of them. I was surprised at how many people were paying their own way to take this class, which was not an insignificant investment in personal time and money. I estimate that about half of the people were there on their own ticket.
The price of the course covers ground transportation to and from the airport, lodging and all meals as well as a copy of Aaron's book and course materials. If you don't want to bring your own computer, a modern iMac will be provided for you to use.
 View from my suite
The place we stayed, Serenbe Southern Country Inn, was probably one of the nicest places I've ever stayed. My personal suite had a screened in porch, a kitchen, a large living room with fireplace, a king size bed, whirlpool tub and huge glass shower. They fed us three excellent meals each day, along with snacks and drinks as we wanted them through the day.
I really benefited from this class. Some topics seem complex when you try to explore them on your own, but Aaron was able to make them very accessible. Cocoa Bindings had always seemed somewhat inscrutable to me, but now things are much clearer. The Undo Manager in Cocoa is amazing; it really showcases how a dynamic language can be leveraged to make something that can be hard in other frameworks really easy. And I now feel like I understand how to build custom Views - something that always seemed difficult to me but is actually quite straightforward now.
The idea of a total immersion environment, with all details taken care of and few distractions, along with a very experienced and patient instructor, leads to a learning environment that encourages success. I highly recommend this class to anyone who would like to learn Cocoa.
Now, I'm not normally a fan of technical training. Give me a book and a web browser and a project and I'm good. Of course this leads to interesting situations like the time I reverse engineered the Windows virtual to physical address mapping structures while not knowing how to refresh an explorer window (It's F5, right?).
I've been poking around in Cocoa for a while now, and though I feel like I made some decent progress, I'm really interested in this technology and wanted to get a comprehensive overview of it from an expert. Sometimes you just want to do things “right.” I figured that in 5 days I'd get a quick but comprehensive overview of most of the technologies in Cocoa from a well known expert in the technology.
The course did not disappoint. We dove right in to code, with Aaron leading us through an example application immediately, before even lecturing. All the lectures were relatively short, and most of the time in the class was spent actually coding. We mostly followed along with the exercises in the book, but we were encouraged to explore and change things as we progressed. In four and one half days we covered nearly the entire book, as well as several additional chapters that were part of the course materials.
In the evenings, most people chose to come back to the classroom and either continue to work on the exercises or to work on a personal project. Aaron typically stayed around until about 10PM answering questions and being generally helpful.
The people who took the class came from all over the country and the UK and had varied backgrounds and skill levels, but overall, they were extremely competent and interesting folk. It was enjoyable to meet each of them. I was surprised at how many people were paying their own way to take this class, which was not an insignificant investment in personal time and money. I estimate that about half of the people were there on their own ticket.

The price of the course covers ground transportation to and from the airport, lodging and all meals as well as a copy of Aaron's book and course materials. If you don't want to bring your own computer, a modern iMac will be provided for you to use.
 View from my suite
I really benefited from this class. Some topics seem complex when you try to explore them on your own, but Aaron was able to make them very accessible. Cocoa Bindings had always seemed somewhat inscrutable to me, but now things are much clearer. The Undo Manager in Cocoa is amazing; it really showcases how a dynamic language can be leveraged to make something that can be hard in other frameworks really easy. And I now feel like I understand how to build custom Views - something that always seemed difficult to me but is actually quite straightforward now.
The idea of a total immersion environment, with all details taken care of and few distractions, along with a very experienced and patient instructor, leads to a learning environment that encourages success. I highly recommend this class to anyone who would like to learn Cocoa.
Mar 10, 2007
Cocoa Application with custom Core Image filter 3: Testing the kernel with QuartzComposer
In the last post I wrote a convolution kernel for Core Image. But these kind of things need to be tested. Now, we could package the filter inside an Image Unit (which I'll do in a future post) but that would mean we would have to recompile and install the filter each time we wanted to make a change. It would be much better if there was an interactive environment that could be used to test any changes and to allow us to debug the filter code.
Luckily, Apple has provided just such an environment in QuartzComposer. If you are not familiar, Quartz Composer is an amazing application that provides a visual programming environment that allows the creation of all kinds of visualizations. If you've seen the RSS screensaver. then you've seen a QuartzComposer composition. If you've seen a preview of Time Machine, the swirling galaxy in the background is a QuartzComposer composition. I'm not going to explore this amazing piece of software in depth here, I suggest you look at some of these websites for more information: Quartz Composer Journal or www.quartzcompositions.com or boinx or Quartonian.
As a basic introduction, a composition is defined by dragging patches onto the workspace and connecting them together graphically. Patches contain ports which represent parameters which are passed between the patches. The results are displayed in real time in the viewer window, so you get immediate feedback as you change things. As we'll see later, Quartz composer compositions can be embedded in a QCView in your Cocoa apps, and controlled via Cocoa Bindings.
I've provided a link to my test.qtz composition which consists of four patches. The convolution patch is built by dragging a core image kernel patch onto the editor and then copying the text of the kernel into the patch. You can use the inspector to change the input parameters to adjust the coefficients and test out the composition.

This is the editor window, showing the composition.

Here's the inspector for the Convolution patch showing where you put the kernel code.

This is the viewer, showing the input image filtered by the edge detection filter defined in the Input Parameters to the Convolution filter.

If you have an iSight camera or other video source, replace the Image Importer with a video input, and you will see the convolution filter applied to your video stream in real time. That's just extremely cool.

Here's the editor window with a Video Input instead or the Image Importer.
 And here's a view of my living room with edge detection. Notice the frame rate of nearly 60 frames per second on my Mac Book Pro.
Using this basic composition, with some modifications, you should be able to test out any core image kernel you can come up with. Next time, I'll build this filter into an image unit that can be used from any application that uses Core Image filters.
Mar 9, 2007
Off to Cocoa Bootcamp
Next week I'm headed off to Cocoa Bootcamp from Big Nerd Ranch. I've been poking around in Cocoa for a while and I know parts of it pretty well, but I've decided to get a solid foundation moving forward. From what I have heard from friends, their classes are excellent.
Mar 5, 2007
Cocoa Application with custom Core Image Filter 2: Implementing the convolution kernel
I this post I'm going to implement our convolution filter as a Core Image kernel. Writing a Core Image kernel is relatively straightforward, as I think you'll see. Core Image kernels are written in a subset of the Open GL Shading language, which is basically just C with some added data types a few keywords and function calls. Apple's Core Image Kernel language reference describes the subset that you can use and also the parts of OpenGL shading language that are not implemented. Of note, are the lack of arrays and structures and severe restrictions on looping and conditionals. The vector types like
A Core Image kernel has but a single pixel as its output, and is therefore applied once for each pixel in the output. So, you can sample any input pixels from as many input images as you want to generate your output pixel. The filter has to be expressed as a mapping from any set of input pixels to each single output pixel. In our case, this is not a problem. 3x3 Convolution is a pretty natural fit for Core Image, since we only have to sample the 9 pixels immediately surrounding any output pixel. So the first step in our code is to declare the header of the kernel:
I declare a kernel called Convolution3by3. The kernel takes a src argument that represents the source image and 9 floats, which represent the 9 coefficients of the convolution. You can see that lack of support for arrays would make a 5x5 or 7x7 convolution quite cumbersome with this system. We also declare a
To perform the convolution, we need to sample the pixels, multiply them by the correct coefficient, and add that value to the result. We've made the conscious decision to maintain the alpha (transparency) value of the result pixel as the alpha value of the center input pixel. Here's the code for the first operation:
What's going on here? First, we call
Notice here that I copy the alpha from the input pixel to the result.
Finally, I
If you want to download a copy of this kernel, it's available on my website: Convolution3by3.cikernel In my next post I'll describe how to test the kernel using the QuartzComposer application and also show how to apply this filter to live video as well as static images.
vec3 and vec4 which provide vector types (very convenient to hold the R,G,B,alpha of a pixel) and the sampler which allows you to sample the imageA Core Image kernel has but a single pixel as its output, and is therefore applied once for each pixel in the output. So, you can sample any input pixels from as many input images as you want to generate your output pixel. The filter has to be expressed as a mapping from any set of input pixels to each single output pixel. In our case, this is not a problem. 3x3 Convolution is a pretty natural fit for Core Image, since we only have to sample the 9 pixels immediately surrounding any output pixel. So the first step in our code is to declare the header of the kernel:
kernel vec4 Convolution3by3(
sampler src,
float r00, float r01, float r02,
float r10, float r11, float r12,
float r20, float r21, float r22)
{
vec2 loc;
vec4 result = vec4(0,0,0,1);
//0,0 in my mind is left and up.
I declare a kernel called Convolution3by3. The kernel takes a src argument that represents the source image and 9 floats, which represent the 9 coefficients of the convolution. You can see that lack of support for arrays would make a 5x5 or 7x7 convolution quite cumbersome with this system. We also declare a
loc variable to hold our current location and a vec4 for the result.To perform the convolution, we need to sample the pixels, multiply them by the correct coefficient, and add that value to the result. We've made the conscious decision to maintain the alpha (transparency) value of the result pixel as the alpha value of the center input pixel. Here's the code for the first operation:
loc = vec2(-1.0,1.0);
vec4 p00 = unpremultiply(
sample(src,(samplerCoord(src) + loc) ));
result.rgb = p00.rgb * r00;
What's going on here? First, we call
samplerCoord() to get the location that the current output pixel represents. Adding the loc to it allows us to grab the correct pixel in the matrix for this coeficient. Next, we call sample()to get the actual value of the pixel at that location. Core Image gives us pixel information with premultiplied alpha, which means that any transparency has been already multiplied through any RGB values for the pixel. This is a useful optimization since it makes compositing simpler. Since we are going to be using the alpha of the center pixel as the output of the result, we need to reverse this to correctly calculate the convolution, thus the call to unpremultiply(). Finally. we multiply the RGB values of the pixel by the coefficient for that pixel and add it to the result. This process is repeated for each sampled location.loc = vec2(0.0,1.0); vec4 p01 = unpremultiply( sample(src, (samplerCoord(src) + loc) )); result.rgb += p01.rgb * r01; loc = vec2(1.0,1.0); vec4 p02 = unpremultiply( sample(src, (samplerCoord(src) + loc) )); result.rgb += p02.rgb * r02; loc = vec2(-1.0,0.0); vec4 p10 = unpremultiply( sample(src, (samplerCoord(src) + loc) )); result.rgb += p10.rgb * r10; vec4 p11 = unpremultiply( sample(src, (samplerCoord(src)) )); result.rgb += p11.rgb * r11; result.a = p11.a;
Notice here that I copy the alpha from the input pixel to the result.
loc = vec2(1.0,0.0);
vec4 p12 = unpremultiply(
sample(src, (samplerCoord(src) + loc) ));
result.rgb += p12.rgb * r12;

loc = vec2(-1.0,-1.0);
vec4 p20 = unpremultiply(
sample(src, (samplerCoord(src) + loc) ));
result.rgb += p20.rgb * r20;

loc = vec2(0.0,-1.0);
vec4 p21 = unpremultiply(
sample(src, (samplerCoord(src) + loc) ));
result.rgb += p21.rgb * r21;

loc = vec2(1.0,-1.0);
vec4 p22 = unpremultiply(
sample(src, (samplerCoord(src) + loc) ));
result.rgb += p22.rgb * r22;

result = premultiply( result );
return result;
}
Finally, I
premultiply() the result with the alpha value and return the result. As you can see, this is a pretty straightforward procedure: grab the values for each input pixel in the matrix, multiply them by their respective coefficients, accumulate the results and return.If you want to download a copy of this kernel, it's available on my website: Convolution3by3.cikernel In my next post I'll describe how to test the kernel using the QuartzComposer application and also show how to apply this filter to live video as well as static images.
Mar 1, 2007
Cocoa application with custom Core Image filter 1: What is image convolution?
Before I delve into development of my Core Image kernel, I think I would like to give a quick description of image convolution. There are plenty of resources on the internet that already describe the mathematics of this procedure in great detail, such as Image Processing Fundamentals - Convolution-based Operations. A Google search will reveal a wealth of information.
While it's easy to get lost in the mathematics, performing an image convolution filter is a relatively simple operation. Basically you apply a multiplier to a matrix of pixels surrounding each destination pixel and add them all together. The result of this operation is the new value of the pixel at the center. For the purposes of these articles, we will be sticking with a simple 3x3 matrix, but there is no reason why you can't perform this type of filtering with larger matrices.
Here are some examples of 3x3 convolution applied to an image:
This first example shows an edge detection algorithm
 This second one shows a sharpness kernel.
 I find the easiest way to think about this is that the coefficients provide the weight that that particular pixel contributes to the final result. If you are interested in interactively exploring this concept, I recommend this site: Molecular Expressions Microscopy Primer: Digital Image Processing - Convolution Kernels - Interactive Java Tutorial. It's got some great interactive tutorials.
In the next post I'll build the Core Image kernel using the OpenGL shading language.
Feb 27, 2007
Building a Cocoa application using a custom Core Image filter (introduction)
A couple of months ago, some members of my team were working on a facial recognition project for one of our customers. One thing they were trying to do was to determine if filtering the images in various ways could improve the recognition algorithm.
They were implementing their system in Java, but I immediately thought that Core Image would make their job much faster, since we could offload the image processing to the graphics cards on our Mac Pros rather than writing the algorithms in Java.
If you are not familiar, Core Image is Apple's image processing framework which can provide very high performance image processing by offloading the work of image processing to the graphics card. Core Image includes a huge number of image filters (just check out the list on the Apple web page).
The test system applied a sequence of image convolution filters to images with varying coefficients and then submitted the filtered images to the recognition system where they would be scored. We iterated over different combinations of filters to find a way to improve the scoring of the algorithm in general.
I was surprised to discover that Apple did not include a convolution filter by default. Convolution is the "jack of all trades" of image processing algorithms and can be used for all sorts of things like edge detection, sharpening, blurring, noise reduction, and so on, depending on the coefficients used.
This meant that I would have to develop my own custom image unit that performed convolution. This seemed like it might be a difficult task, but it turned out to be much easier than I expected. Along the way I learned a lot more about Quartz Composer, programming using the Open GL shading language, Cocoa Bindings, and creating custom image units on Mac OS X.
Over the next several posts I'll step through the development process to a working sample Cocoa application that allows you to apply convolution to any image.
Subscribe to:
Posts (Atom)